Provide Document Feedback for Efficiency

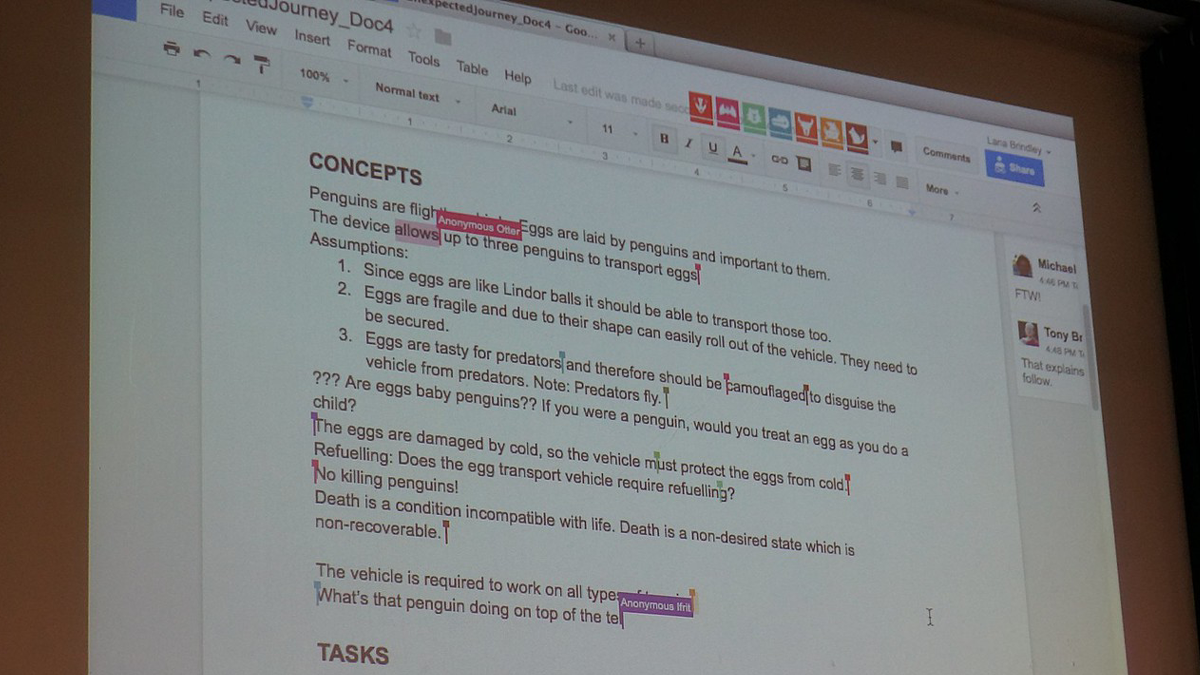
(Featured image “Collaborative documentation editing” by 4nitsirk is licensed under CC BY-SA 2.0.)

When providing document reviews with comments or track changes, most people start writing their comments as they read through. This is perfectly natural and recommended, as capturing your thoughts immediately is the best way to ensure they aren’t forgotten. That said…

As you read through the document, some of your comments made earlier may be addressed later in the document. If you think the content should be moved, this is a good time to point that out, referring back to your earlier comment. If not, take the time to move the comment to the appropriate point, or revise it accordingly.

Short-term memory varies between person to person and even context to context. A comment provide early in the doc is likely to be remembered and reference back when it discovered at the end that it was not necessary if the review is done in a single sitting or as part of a very focused project. Then again, someone stopping by to say “hi” or an IM popping up immediately after writing a comment can pop the memory out of the short term queue and only invoke vague familiarity if the concept is addressed later. Because of this unplanned and unschedulable variation in memory reliability, I suggest re-reading through all comments prior to submitting them. It will (hopefully) catch those forgotten inputs that should be revised in the context of the entire document so that the sent input is concise.

The value of concise input is two fold: It makes it easier for the person receiving the feedback to apply it where needed, and it avoids the frustration of seeing comments from a review that the author knows are not valid because they are addressed later on.
If you found this interesting, please share.
Temporarily Disable MWB to Update VSC

Malwarebytes and Visual Studio Code Updates

Either my Google search skills are degrading or the signal-to-noise ratio on this topic is so high only the noise comes through. Either way, I am posting a fix I should think would be easy to find but wasn’t…How to complete Visual Studio Code (VSC) updates with Malwarebytes Premium installed.

To say I found no answer is a bit of an exaggeration. I found several that were just plain unhelpful, and one that worked, but not acceptably. The first time this was an issue, I found an unacceptable solution (I say an, because I don’t consider removing Malwarebytes to be a solution, nor any of the less-polite suggestions of what to do with it) was to turn off Malwarebytes to run the update. While this works, every-vigilant Windows thinks it is an opportunity to win back territory for Defender and starts it, which prevents re-starting Malwarebytes. Being a busy techie, re-starting Windows is a long task because I always have at least 20 applications running.

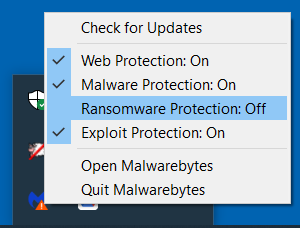
So when the issue came up again today, I dove back into to the deeper Google waters, i.e., page 2 of the results, and did find a suggestion to temporarily uncheck “Enable Protection”. This must have been referring to a different version, as that was not one of the options. There were several others that could be disabled. To cut a long story short (note that whenever that phrase is uttered is inevitably too late already), I went through the options one by one and found that one that allows the installation to complete: Ransomware Protection.

Temporarily Disable MWB to Update VSC

Here’s hoping this post saves someone some time.

If you found this interesting, please share.

Replace Auto Dates in Templates

Many templates include a date that is based on the current date. In the good ole days, when a designated file type for a template was used and the file was saved as a standard file, that date would stop updating automatically.

These days, most templates are just a previous file where the original content was stripped and labelled as a template, and even those that are specified as template types still keep the date updating after saving to a file. This makes the date of the content unknown, the opposite of the value of including a date.

For the sake of those who want to keep content in context, please develop the habit of replacing the auto-date with the actual date when publishing documents.

In some templates, fixing the date is hard to do, especially if someone has locked aspects of template with good intentions (and annoying consequences). In that case, overlay text on top of it with the correct date with the background fill blocking out the auto date.

If you found this interesting, please share.
Project Team

Failure to plan communications is communicating a plan to miscommunicate

Most project charters include a communication plan, and it generally consists of who to communicate what to. What is often missing is the how, which is why many teams find themselves with endless email chains where the subject stopped reflecting the content a dozen messages down the thread.

Many enterprises offer multiple platforms, such as Slack, Teams, SharePoint, Confluence, Jira, ADO, etc. If there is a choice, determine how the team will most efficiently interact and then pick the tool that has the best features supporting those interactions. If there isn’t a choice (such as when a company may have several tools but a department only has one), be sure to keep some key communication and collaboration practices in mind as you plan its usage.

Taxonomy

Group topics in an intuitive manner. What is intuitive generally versus only for insiders can be different. If the team membership will fluctuate frequently, opt for intuitive for someone who needs to be productive quickly with little help. Long-term teams should evolve the taxonomy over time to foster productivity.

Formatting

We all get busy and skim our in box or project sites looking for what jumps out at us. Consistent formatting can help. Have predefined prefixes such as “ACTION REQUIRED:” or “No Response Necessary:” can help people see what is important and prioritize reading and responding. The range of formats can be very broad, so a full list is not appropriate here.

Read Me

The best of plans do not survive the first release. The taxonomy may fall out of date. Determine the most common entry point to the team collaboration and communication platform and post and pint a Read Me that explain the purpose of the team, the organization of the platform, and who to contact for help by topic.

Channels

Often a project will have multiple channels: The project management tool, the wiki, and IM client, email (sparingly). The team should decide which channel to use for what and gently remind people who use the wrong channel where the appropriate channel is and why.

If you found this interesting, please share.
Webhook Screen

A quick and simple Salesforce webhook listener

Quick summary: How to set up your Salesforce org to listen for webhooks

Setting up your Salesforce org to listen for webhooks should be easy. Actually, it is easy, but it seems the steps are buried in different places like Horcruxes. I’m going to assemble them here, and if He-Who-Must-Not-Be-Named shows up, he can proof-read this for me.

So, we start with a simple Apex class. There are a bunch of examples of this. The easiest one for a quick start is in the Salesforce blog post “Quick Tip – Public RESTful Web Services on Force.com Sites.” Remember, it is a quick demo. Your final code should look like something between that and the example from the Salesforce Apex Hours video “Salesforce Integration using Webhooks.” My example is:

@RestResource(urlMapping='/hookin')
global class MyWebHookListner {
    @HttpGet
    global static String doGet() {
        return 'I am hooked';}
}

Now, the tricky part is that the Quick Tip blog has instructions and a screen shot of “just need to add MyService to the Enabled Apex Classes in the Site’s Public Access Settings,” followed by a wonderful example of a sample URL. Because I used Sites and Domains customizations once for a Trailhead exercise six years ago, the connection did not immediately click for me, nor the other steps. I will save you the tedium of reading all that I went through, which included pausing the aforementioned video several times to capture the exact steps and summarize them for you here.

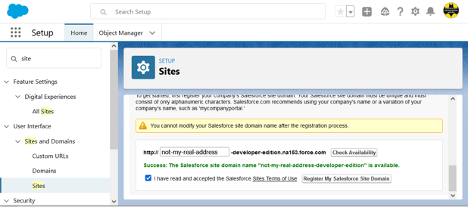
In Setup, search for “site” and select User Interface > Sites and Domains > Sites from the results. Create a site here if you don’t already have one (and if it is in production, make sure it is the URL you want).

Now, the tricky part is that the Quick Tip blog has instructions and a screen shot of “just need to add MyService to the Enabled Apex Classes in the Site’s Public Access Settings,” followed by a wonderful example of a sample URL. Because I used Sites and Domains customizations once for a Trailhead exercise six years ago, the connection did not immediately click for me, nor the other steps. I will save you the tedium of reading all that I went through, which included pausing the aforementioned video several times to capture the exact steps and summarize them for you here.

In Setup, search for “site” and select User Interface > Sites and Domains > Sites from the results. Create a site here if you don’t already have one (and if it is in production, make sure it is the URL you want).


If you created the domain just now, scroll down after clicking the Register My Salesforce Site Domain button and click the New button at the bottom. Fill in only the required fields (remember, this post title starts with “Quick and simple,” not “Safe and secure” … though you should do that on your own until I write that version), and Save (there may be a delay before the screen refreshes … be patient, as clicking it again will cause it to try to create another site and give you an error message). If you already had a site, click the site name in the list at the bottom of the page to get to Site Details page, specifically, the Public Access Settings button.

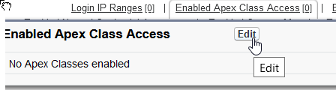
Here we want to find the Enabled Apex Class Access link and click it or the Edit button that pops up on hover:

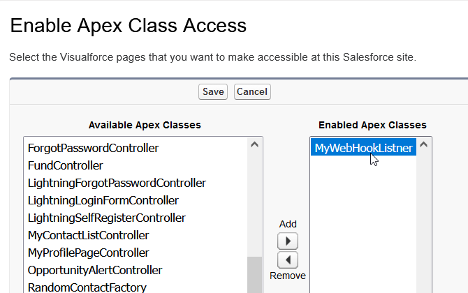
And finally we get to the screen shown in the Salesforce blog post that lets the magic happen:


Add your class, save, and you may need to navigate again to the bottom of the Sites page and click the Activate button to activate the site you have created.

Now, take the site URL and add services/apexrest/[urlmapping] (the value used in you Apex code for urlMapping=) and go there. (The full URL will look something like “https://my-developer-edition.na9.force.com/services/apexrest/myservice,” with the bold text matching your site address and urlMapping, respectively.)

If all went well, you should see what ever nifty response you set as a return string, at which point you can get rid of the return string and do the serious stuff you want to do with your webhook. If not, drop me a line describing exactly what happened and I’ll try to figure out which of us skipped a step.

Also, for that security stuff I had said I wouldn’t cover, I do have to recommend that you:

  • Make sure that you handle all verbs and kill off the ones that aren’t expected.
  • Check the referrer for matching where you accept requests from.
  • Validate the format of the request matches what you expect.

Again, there may be more details in a future post. This one was just to make sure I didn’t have to go on another Horcrux quest.

To summarize all of above cheekiness into a set of steps:

  1. Your webhook class will be a RestResource.
  2. You must have an active Salesforce Site.
  3. You need to enable your RestResource Apex Class under Public Access Settings for Salesforce Sites.
  4. Your listener URL will be your Salesforce Site address/services/apexrest/urlMapping.
  5. You should secure the heck out of the class and processes before letting it access anything beyond a simple response string.

Originally published at Logic20/20 Insight

If you found this interesting, please share.