"Technology should make things easier for people. I simplify technology." – Scott S Nelson
Programming
Things that help, hinder, or horrify happy developers at work. I used to call this category Development, but delicious has more tags for programming. “Go with the grain” – Jethro Gibbs
I forget the fix to this every time, so posting here to remember.
First, set the Project > Web Use Local URL and fill in Override application root URL. It will want to create a virtual directory. Let it, then remove it in IIS after debugging starts.
I know there must be a better fix, but this gets it moving when in a hurry.
[msbuild] E:DLT_SVNWebGNMA.RFS.Web.csproj(189,11): error MSB4019: The imported project “C:Program FilesMSBuildMicrosoftVisualStudiov9.0WebApplicationsMicrosoft.WebApplication.targets” was not found. Confirm that the path in the <Import> declaration is correct, and that the file exists on disk.
$(MSBuildExtensionsPath) on my 64 bit machine resolved to the path of a 32 bit machine because Nant is compiled as a 32 bit program. Argh. So:
set MSBuildExtensionsPath=C:Program Files (x86)MSBuild
Re-post from the original publication on December 4, 2008 at Developer.com.
Most developers like to write clean code. So why is so much code in the world messy? While there are many opinions about this, there are two contributing causes that very most everyone will agree on.
One of the reasons is that there is rarely enough time to write code as cleanly as we would like. Even when code starts clean, the continual refactoring from changing requirements, shifting dependencies and the inevitable bug fixes (often a result of the first two factors) leads to messy code just as surely as short deadlines and long hours make an organized person’s desk become littered with piles of unfiled papers and unfinished notes.
The other reason that is generally agreed on for code in the real world not being as clean as it starts out in our minds is because not everyone generally agrees with what clean code should look like. Some people are more certain that their version is cleaner than another, and there are people who hold different opinions with equal conviction. For example, which row the opening brace of a method belongs. An example where I’m fairly certain I am not the only person who has had endless email threads and inconclusive meetings about. The one, final answer will not be decided in our lifetime.
While the coding standards of an enterprise or project team may begin as a democratic process, they will not be useful as a benchmark until their definition evolves to a benevolent dictatorship (remember, we are discussing business, not government here). Once the standards are defined, a third reason for not meeting them comes into play, which is that there are usually more rules than most folks can memorize, or remember when the time pressure is on or when the rules of one project differ from those of another. For these causes of messy code, I have found PMD to be the best solution based on its flexibility and ease of use. The letters themselves do not really stand for anything. The creator(s) just thought they sounded good together. The PMD home page supplies “several “backronyms” to explain it.”
About PMD
The PMD home page describes the value of the project simply and concisely as something that scans Java source code for potential problems such as possible bugs, dead code, suboptimal code, overcomplicated expressions, and duplicate code.
PMD is more than just an Eclipse plug-in, in fact it is available as a plug-in for many IDEs. It can be run from a command line or as an ANT task. This makes it perfect for Agile projects as it can be integrated into the developer’s IDE and run as part of an automated build process. Even if you aren’t running automated scans at build time, making it part of your IDE will allow you to write cleaner code as a developer and to speed up code reviews as a reviewer.
Eclipse Plug-in Installation
While Google is a developers best friend (though I really miss DejaNews), for the more mature Eclipse plug-ins it pays to read the details of your Google search results. In the early days of Eclipse plug-ins, the use of the update manager was less prevalent. Most plug-ins at that time were made available as downloads. Many of the plug-in projects that have survived since those early days have since moved entirely to the Eclipse project’s preferred method of using the update manager. While this can be annoying to those of us who began using Eclipse in the early versions (especially when maintaining a portable tool kit), it is a much cleaner way for plug-in projects to publish their wares and make it easier for the user to get the correct version for their workspace. I mention this because while preparing for this article my Google search found the original download site at http://sourceforge.net/projects/pmd-eclipse. Even though it wasn’t the highest ranked, it did come in third and the habit to want a download rather than an update manager URL is hard to break. Just before downloading the zip file, I noticed that site was last updated in 2005. Had I installed that version I would have then spent part of my afternoon cleaning up the mess of my highly-personalized workbench.
Figure 1: Access the Update Manager from HelpSoftware UpdatesFind and Install
Figure 2: Select Search for new features to install in the Update Manager Options
Figure 3: Add the PMD URL to the Site List
From this point, the standard “Next, Next, Next” steps can be easily followed. Upon success, you will have a new perspective in your workbench:
Figure 4: The PMD Perspective
If you happen to use the PHP version of Eclipse you will need to accept the restart Eclipse option or be annoyed by prompts telling you that your workspace is a mess.
Checking Your Code with PMD
While PMD can be customized to meet your coding standards, you can start using it immediately after installation with the default configuration. For those who don’t already have documented coding standards, these defaults can provide a good starting point.
PMD allows you to check code at any level available in the code view, i.e., at the project, package or class level. The code check is run by right clicking on the code level you wish to check and selecting Check Code with PMD from the PMD options:
Figure 5: PMD Options in Right-Click Menu
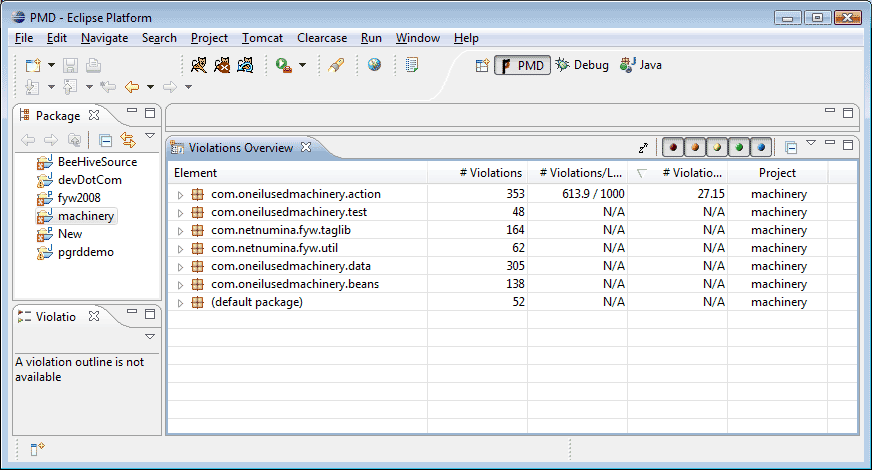
The location and number of violations is then displayed in the PMD view.
Figure 6: Check Code with PMD Results
You can drill down in the Violations Overview from the level you ran the check at all the way to individual line and violation description.
If you are introducing PMD mid-stream into a large project, the scan can take a long time. Once PMD has become part of your regular coding environment, getting in the habit of running a scan on each class you have created or updated prior to checking it into source control can save hours of bug hunting, not to mention reducing the possibility of embarrassing comments during code reviews.
After running a code check, the results can be exported by selecting Generate Reports from the PMD menu. A new folder will be added to your project named “reports” where the output will be available in several different formats.
Another cool feature is the ability to search for duplicate code with the Find Suspect Cut and Paste menu selection. The results of this search can help to pin down repeated code that should become part of a utility class.
Customizing PMD
If one reason for messy code is the differing opinions of what constitutes clean code then the expectation that the default rules will be perfect for every project is a bit ambitious. The PMD project takes this into account by making it very easy to customize which rules to enforce and what level of attention they should be given.
The basic view generally won’t need to be changed:
Figure 7: Basic PMD Option
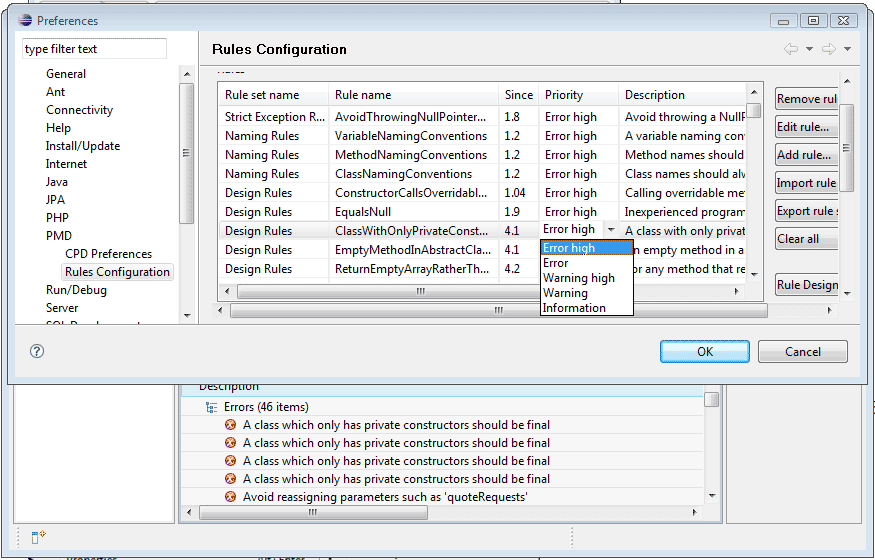
The predefined rules can be edited and removed easily in the preferences view. Changing descriptions to match the text of your coding standards can make the standards themselves easier to remember. As running the code check becomes more of a habit, most developers will tend to have fewer violations as correcting them reinforces remembering how to code to the standards.
Figure 8: Customize Rules with Configuration
One key option is the violation level. In the code check results view there are color coded toggles to set what level of violations to show (see Figure 6). When time for code review is limited, selecting the higher priority level (lower numbered) violations can help developers and reviewers focus on the most urgent violations.
When determining what level a violation should be it is a good idea to avoid the temptation to go too high as the top level violations will prevent compilation of code.
Figure 9: Error High Prevents Compilation
If you are adopting PMD mid project, setting too many violations at the highest level can bring project progress to a screeching halt or drive developers to remove the plug in, both results defeating the purposes of improving quality while saving time. However, if PMD is part of your environment from the first line written, high violation settings can lead to improved code quality throughout the project.
PMD also allows for creating your own rules, a task that is far beyond the scope of this article. Full documentation is available at http://pmd.sourceforge.net/howtowritearule.html. Most teams will find that customizing the descriptions and priorities of the large selection of pre-defined rules will be more than adequate for their needs.
Once the rules have been customized to match your standards, they can be exported for sharing across the enterprise or team.
While the tool itself is simple to install, customize and use, creating practices and policies to get the most of its use may take a bit more work. My personal preference is to make sure all violations at all levels have been addressed prior to the completion of the QA phase. Even with the best-defined rule sets, there will be some exceptions to the rules, and the project allows for this by providing a “Mark as reviewed” option. Using this option adds an annotation at the end of the line of code that will allow the code check to skip that violation in future checks.
Conclusion
PMD is a great tool for improving code quality, developing good habits and speeding up code reviews. It is not a panacea that can completely replace manually reviewing code. Code is an art as well as a science and automated tools have a long way to go before a level of heuristics that can be 100% reliable will be reached.
Everyone agrees that self-signed and demo certificates for SSL and HTTPS should never be used in production and preferred not to be used elsewhere. Most self-signed and demo certificates are provided by vendors with the intention that they are used only to integrate within the same environment. In a vendor’s perfect world all application servers in a given enterprise are from the same vendor, which makes this lack of interoperability in a non-production environment an advantage. For us working in the real world, where not only do we not use a single vendor everywhere but have to make do with self-signed certificates for all but production, testing HTTPS between an IIS ASP.NET service provider and a WebLogic J2EE consumer application can be very frustrating to set up. It was for me, especially having found many blogs and discussion threads where various solutions were described but did not quite work and were all mostly similar but just a little bit different. To save both you and my future (who always seems to forget the hardest-won lessons) all of the pain and suffering, I am recording the steps that finally worked here for reference and sanity.
How You Know You Need This
The first cold clutches of dread that tells you it is going to be a long day is when you attempt to a WSDL published by IIS in WebLogic over HTTPS and you see the following:
<Jul 30, 2012 2:51:31 PM EDT> <Warning> <Security> <BEA-090477> <Certificate chain received from myserver.mydomain.com – 10.555.55.123 was not trusted causing SSL handshake failure.>
weblogic.wsee.wsdl.WsdlException: Failed to read wsdl file from url due to — javax.net.ssl.SSLKeyException: [Security:090477]Certificate chain received from myserver02.mydomain.com – 10.555.55.123 was not trusted causing SSL handshake failure.
The above is what started a three day sojourn into searching for a solution. Even people who had solved it before would tell me how they did, and then shrug when I demonstrated that the steps did not end in the success they claimed I would experience. Rather than torture you with the details of everything I did that did not work, here is what finally did work.
Export the Certificates from IE
First, take the offending WSDL URL and paste it into IE (if you have an internal Microsoft CA, you have IE, even if you don’t use it in favor of some other browser). To state the semi-obvious, if you received the error above there is a certificate configured for the IIS host of the service and the SSL port has been configured properly. Otherwise there would be a different error, usually about the site not found or connection failed.
Once the WSDL loads, to the right of the address bar there will be a lock icon. Click the lock and then click View Certificates in the resulting dialog (if you do not have a lock icon but do have a Certificate Error message, see http://support.microsoft.com/kb/931850 for steps to install the certificate then you can continue from the point of finding the lock icon).
Next, select the Details tab in the resulting dialog
Figure 2: Use Certificate Details to Export Certificate
Figure 2: Use Certificate Details to Export Certificate
Click Copy to File, then Next, then select the Base-64 encoded option for the format
Figure 3: Select the Base-64 encoded option for the format
Figure 3: Select the Base-64 encoded option for the format
For the sake of simplicity, I choose to save this to the root of the WebLogic domain. It will work from anywhere, but later you will need to type in the full path rather than just the certificate name if you save it elsewhere.
Figure 4: Browse to Save Location
Figure 4: Browse to Save Location
Figure 5: Save the Certificate to the Domain Root for Convenience
Figure 5: Save the Certificate to the Domain Root for Convenience
This is the point where I ran into some confusion. Some articles mentioned exporting the entire chain of certificates. This supposedly works for some types of certificates, or if you have a few other tools and the time to learn them. For the SSL experts out there, they already have these tools, know how to use them well, and should not be wasting their time reading this article meant for folks who just want to get things wired up and back to unit testing and development. For the rest of us, the easiest way to make sure things will work is to just export all the links in the chain individually and let WebLogic Server worry about re-assembling them into a chain (which it does quite nicely). While perhaps not the most elegant solution, the multi-step process is easy to repeat and uses only tools that are immediately available and require no learning curve. So…
Next, go to Tools then Internet Options then the Content tab and click Certificates. Go to the Trust Root Certificate Authorities tab and find the certificate root for your Microsoft CA cert (look for the Issuer of the certificate you exported earlier).
Export this one the same way as before, with a different name
Figure 7: Use a Unique Name for Each Certificate
Figure 7: Use a Unique Name for Each Certificate
Repeat this once more for the Intermediate Certificate tab.
Import the Certificates to the WebLogic Domain
Now, open an command prompt, navigate to [WEBLOGIC_DOMAIN_ROOT]bin and execute setDomainEnv. You should then be in the root of the domain. If not, CD to the domain root.
Assuming you saved the certificate in the domain root, execute the following:
In the above we created a new JKS key store. You can re-use an existing one by changing the name of the JKS file to one you already have and change the password to the one that matches that JKS file. For the DemoTrust.jks that is included with WebLogic the password is DemoTrustKeyStorePassPhrase. An example here would be:
Where “truststore.jks” and “password” can be replaced appropriately if necessary. The output will look something like this:
Figure 8: Output from keytool -list -keystore
Figure 8: Output from keytool -list -keystore
Update the WebLogic Keystore Configuration
If you used an existing keystore rather than creating a new one, you can restart your WebLogic Server and skip the rest of this section. For those of us who created a new one because that is the instructions we found online…
Next, we need to tell WebLogic to use the JKS file (truststore.jks) we just created. Log in to the WebLogic Server Administration Console and navigate to Servers > AdminServer > Configuration > Keystores. Scroll down to “Custom Trust Keystore:” and change the value to “truststore.jks” and the value of “Custom Trust Keystore Passphrase:” and “Confirm Custom Trust Keystore Passphrase:” to the password you used when earlier, then save your changes. You will get a nice message similar to the following:
Figure 9: To Be Safe, Restart Anyways
Figure 9: To Be Safe, Restart Anyways
The “No restarts are necessary” is somewhat of an exaggeration. If you want to be able to use the keystore you may need restart the server(s). To save myself aggravation, I always do. Your mileage may vary.
Conclusion
That should get you there. If there are some erroneous steps included for your situation in particular, I will offer up a semi-apology as the process described above does not take long at all and if there is one step that could be dropped from it, is still much faster than trying to figure this out from other sources.