One of my rare posts on my employer’s site: Taming Complex Cloud Integrations with Informatica Cloud | Primitive Logic
© Scott S. Nelson
One of my rare posts on my employer’s site: Taming Complex Cloud Integrations with Informatica Cloud | Primitive Logic
Salesforce uncoded: the reality of code-free Salesforce communities | InfoWorld
My other blog is a publisher’s website 🙂
Note: The tag line “An interesting challenge achieved … but at what cost?” was added to the original post by the IDG editors and I’m not really sure why. I think that it is great how Salesforce has empowered the citizen developer to mash up components provided by the vendor and IT so that IT can focus their time only on the parts that really do need a customized solution. This leads to better custom solutions and greater use of the platform.

(Feature photo by Markus Spiske)
One of the biggest misconceptions about troubleshooting systems is that it requires deep, specific technical knowledge to locate and solve production issues. This assumption can often result in extending the time between the discovery and resolution of a problem. At first this may seem counter intuitive, so let’s look at some common scenarios to see which concept is makes the most sense.
To start with, most assumptions about broad concepts are generally wrong because they are based on the expectation that there is a single, best doing things every time. There are certainly times when the developer of a particular solution can look at a problem a production application is having and instantly say “I know why that is happening”. This happens not because the developer deliberately left an issue but because most solutions have multiple, valid approaches. Some of them can have flaws that may not be immediately obvious. In some cases, all options have flaws and it is a matter of choosing the path with the weakness that is least likely to be found “in the wild”. The experienced developer will unconsciously be aware of these potential problems and, when presented with the issue in production, will instantly recognize it. In most cases these things will surface and be addressed in QA before they reach production. By the nature of production systems (where users are always more inventive than the best QA analyst), the application will encounter something that was not anticipated.
Once in production, the key to identifying the cause of the problem is to look at what is happening, where the person with deep, specific knowledge will most likely first look for what is expected to happen. There lies the trap. If a reasonable QA effort was put in before release, it is what is unexpected that is more likely to be the issue. The easiest way to find an issue that isn’t immediately obvious is to have no expectations and instead observe what the behavior is and trace it back to its origin with no anticipation of what will be found. It is much more about applying a way of thinking than it is about knowing something in advance to find the root cause.
There is also the psychological aspect that can occur in having the original developer investigate the issue. For reasons that could fill another article (if not a whole book), the first thing the developer tends to look for is something outside their application as the cause. It is quite possible it is something from outside causing the issue. The more experience the developer the more likely this is the case. In trouble-shooting, the goal is to fix the problem and having any assumptions at the start can delay finding the problem where ever it is. Yes, sometimes those intuitive assumptions are useful, so long as they are abandoned if they don’t quickly prove out.
When issue is determined to be outside the responsibility of the person or team investigating, the mistake most often made is to hand it off to another team before clearly understanding how the external system is causing the issue. Failure to articulate irrefutable evidence of the source of the issue before passing it on to those responsible for that part of the system to solve can result in an unproductive back and forth between developers or teams as they also expect it is not in their work.
Once the issue is identified, deep knowledge may still hinder resolution and will not always be necessary. I was recently asked to help with an issue where the production support team followed a recommendation from the cloud platform vendor support to address an issue with throttling by moving the offending process on premise in a hybrid solution. While platform support knows their platform really well, the myriad ways it can be implemented is just not possible to always anticipate how combinations will work out. The support team followed the advice without thinking about why that process was deployed to the cloud to begin with. The change resulted in new issues because there were insufficient resources in the on premise server. Further, when validating the change they only looked at the cloud monitoring (where the problem originally manifested). The failure point had been moved to the on premise system and it was the business that reported the new manifestation of the problem (and brought me in to help).
The final solution was to manage the iterations in the process being throttled to bring it within threshold limits. This required no knowledge of the cloud platform beyond that throttling was a factor, and no detailed knowledge of the specific implementation as the logs clearly pointed to where the failure was occurring which was the point where the counter needed to be added to avoid the threshold.
To sum up the lesson, the ability to suspend assumptions and ego are far more critical than specific technical knowledge to solve issues in production. During development it is common to be stuck for a while solving a bug and to ask someone else to look at the problem with a fresh perspective. Carrying this process on into production will resolve issues faster and leave more time for working on the next cool iteration.
(Originally published JAN 17, 2018 at InfoWorld as “Production system troubleshooting 101: it’s not always about technical knowledge”)
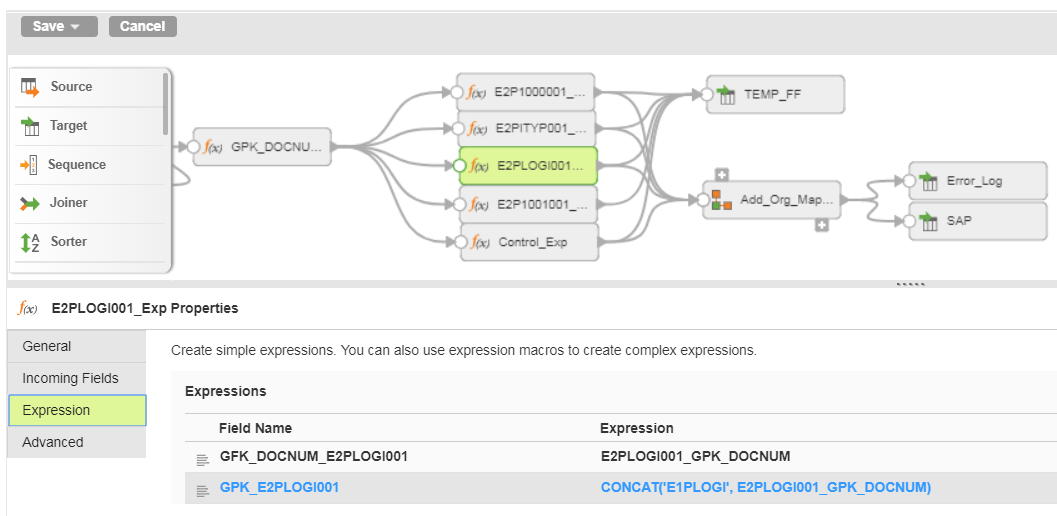
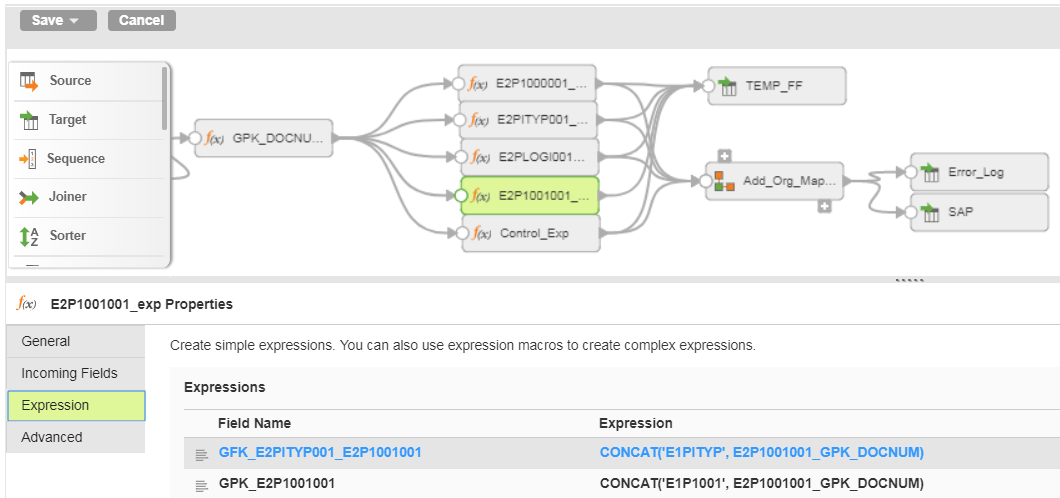
One type of mapping I find particularly complicated to build is one using the SAP iDoc connector. The complicate part is achieving the correct value nesting. It is complicated because when you create the mapping, the nesting is not visible. It is created by the use of Primary and Foreign key fields (GPK and GFK in the mapplet).
I have seen several approaches to this that work and the approach I am going to share here is the one that I came up with and use because I understand it. YMMV.
First, I create a list of GPK and GFKs from the mapplet XML. These values can be found in the TRANFORMATION nodes within the MAPPLET node.
With this list in hand, I create the document GPK with a field that will be unique per iDoc. In this case I have a unique entity ID in my source and a date field that will make the entry for the entity unique. I prefix this key with the OTYPE because I may have multiple entries for the same object on the same date but different OTYPEs.

Then, for each immediate child, I define its GFK and GPK using the node names as prefixes:
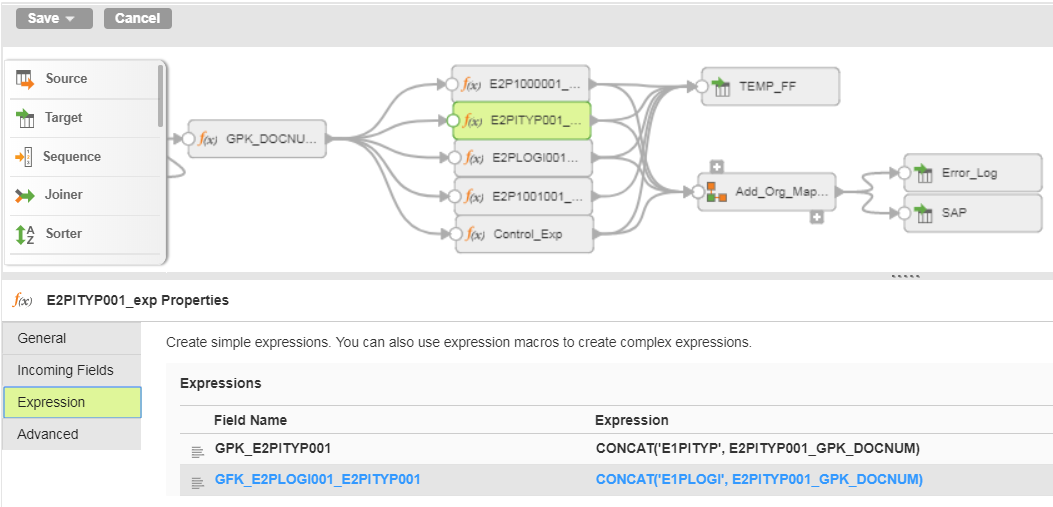
The above examples goes three levels deep. If your iDoc requires nest your nodes in a different pattern, generate your GPK values in such as way that they can be properly created in both the parent and child node.
For ease of maintenance, I name the fields in the expressions the same as they are defined in the mapplet so that I can use Automatic field mapping, which is eliminates the need to manually re-map anytime I make a change:
I hope this saves you some of the time it took to get me to this approach.

Citizen development is really a responsible response to the dilemmas created by Shadow IT. Now that technology is available to those with minimal technical knowledge business users will implement solutions without the help of the IT department. The best thing IT can do about this is mentor the business users in ways that will support what business is going to do anyway in a way that will not lead to enterprise-level headaches. Salesforce is at the forefront in helping business and IT with this new paradigm.
The number of times I revised the title of this post is a sign of the times in technology. Those not steeped in the gray arts of technology may think that since computers process 1’s and 0’s that going from thought waves to software is a linear and clearly defined path. The more the technology evolves the less true that is. I started with the title of “How Salesforce Enables Citizen Development”, but a key premise of this post is that it is not a check box in the system administrator’s console, which the term “enables” insinuates. “Citizen Development with Salesforce” was considered and rejected because it has a tone that suggests that there is no longer a need for highly trained Salesforce administrators, architects and developers. Not only do I disagree with that premise, I more emphatically caution against the invalid assumption that such a void would result in cost savings. These nuances of title may seem like a lot of over-thinking except that as both a writer and reader I am all-too-aware of the tendency to base a fully formed opinion on the title alone.
I was recently asked to sum up the benefits of citizen development and came up with the following:
Salesforce supports citizen development by providing a platform with capabilities that can be accessed and utilized with a minimum of training and experience. The unbridled optimist will look at the preceding sentence and imagine a world where every business user can build applications that are easy to use and will contribute to productivity at a lower cost.

The realist would (and should) take umbrage with the word “every”. Putting aside the variance in individual capabilities, there are other key factors that make “every business user” a dangerous assumption. Two key factors are time and inclination. It takes both to perform any one of the following critical tasks for a successful application: Determine the full range of business requirements an application should address; analyze the variety of technical solutions and appropriately select the best fit for the requirements; review the existing functionality within the organization for potential reuse and impact; train and support other users in the resulting application; and maintain proper data governance to ensure both adequate security and cost controls.
So, perhaps a better statement of how Salesforce supports citizen development would be “Salesforce provides the tools for an enterprise to enable business users to build applications with little or no IT support when proper governance processes are established and followed”. This phrase doesn’t fit on a bumper sticker as easily as “Clicks not code”. Perhaps “IT doesn’t go away. IT gets out of the way” almost fits, though.
The “lower cost to deliver” benefit is based on the streamlined process of citizen development, i.e., no need for business to create a full specification to hand off to IT for implementation since business will own the development. In an enterprise where the IT team is continuously backed up, this will lead to faster time to delivery as well. In cases where the scenario is simple or common enough to be configured in a generic manner, a great deal of time can be saved. However, this should not be confused with the false assumption that configuration over coding is inherently faster. Sometimes it is and sometimes it is not. Declarative programming must be provided in a way that is maintainable by the vendor and generic for the customer. For a skilled developer, custom development can be completed in far less time than it takes to configure a collection of generic options to something as simple as loop through a specific set of data looking for a specific output.
If it sounds like citizen development is a bad idea that is neither the case nor the intention. Application development is like raising a child… it takes a village with each member contributing their specialty at the best time and in the appropriate context. A governance group to provide guidelines, consider exceptions and enforce adherence; Architecture and security specialists to determine the best way to ensure compliance; Developers to provide reusable components when they are not readily available from the App Exchange; Trained Salesforce system administrators to enable appropriate permissions, configure necessary integrations, and manage production deployments.
In short, all of the roles that an organization following best practices for platform use will have in place anyway. On the one hand, supporting citizen development adds some additional tasks to those who support the platform. On the other hand, properly supported citizen development frees up platform support personnel to better focus on the tasks that most need their skills while improving relations between business and IT by enabling business to more self-supporting.
Originally published at InfoWorld